A list owner is entrusted with its members’ personal information (email address and name), and this carries certain responsibilities with regards to ensuring privacy and security. You must determine what level of security is most appropriate for your list. For example, a closed family list where all members know each other personally may be set to Review=Private (any list member may get the list of all subscribed addresses), but any list with subscriptions open to the public should be set to Review=Owners. A hobby discussion list may operate with relaxed security and deal with transgressions as they occur, but a commercial newsletter must have very tight security as any breach will reflect poorly on the department/organization’s reputation. On an open discussion list, subscribers are aware that the discussion may sometimes stray off the topic, whereas on a moderated list they expect that you will exercise more control over what gets posted. On a one-way list, subscribers will hold you responsible for every posting.
As the owner of the list, it is your responsibility to:
- Understand your list’s configuration.
- Let subscribers know what they can expect from the list when they sign up.
- Help subscribers subscribe and sign off.
- Assist subscribers when they have difficulties with the list.
- Ensure that the list abides by the site’s appropriate use policy and applicable laws (for example, disallow the propagation of copyrighted materials not belonging to the sender).
- Prevent abuse of the list by third parties. For example, always require subscription confirmations on open lists, prevent outside access to subscriber email addresses (Review=Owner), and require confirmation of all postings to one-way lists (Send=…,Confirm).
- Receive and review all mail sent to the listname-request address. This address is publicized as the way to get in touch with the list owner when a subscriber or potential subscriber requires assistance.
Sending email messages to LISTSERV containing commands and posting messages to the list is sometimes confusing for people who are new to mailing lists. To simplify this process, the Web interface provides a centralized location for interaction with LISTSERV. As a list owner, you can use the Web interface to issue commands directly to LISTSERV and post simple messages to the list.
To maintain your list via the Web, visit https://listserv.naropa.edu/scripts/wa.exe and sign on using your email address (example@naropa.edu). Use your Naropa Account Password.
How to login
1. Go to: https://listserv.naropa.edu/scripts/wa.exe
2. Type in your Naropa login credentials.

3. After successfully logging in, click on "List Management" then "List Dashboard".

This interface is where you can manage the various lists that you are either an "owner" or "moderator".
The following information is for owners and moderators to manage listservs from their email account.
Add Subscribers
To add a subscriber just send an email to LISTSERV@LISTSERV.NAROPA.EDU with the following command:
QUIET ADD LISTNAME person@that.com FirstName LastName
*Note: make use to change LISTNAME to the name of your list.
Remove Subscribers
To remove a subscriber just send an email to LISTSERV@LISTSERV.NAROPA.EDU with the following command:
QUIET DEL LISTNAME person@that.com
*Note: make use to change LISTNAME to the name of your list.
Review Subscribers
To receive an email notification with the names and addresses of all subscribers and a count of the number of people subscribed to the list, just send an email to LISTSERV@LISTSERV.NAROPA.EDU with the following command:
REVIEW LISTNAME NOH BY NAME
*Note: make use to change LISTNAME to the name of your list.
Navigating the Web Interface
- Top Banner – Default Page header
- Navigation bar – Appearing on the top side of the main form is the navigation bar. The navigation bar stays generally the same from page to page and contains links back to the various main areas of the Web interface that you have access to: List Management, Subscribers Corner, Email Lists, Preferences, and Log off.
- Technical Support – Click on the life buoy for assistance.
- Moderation – Edit moderation settings here by clicking on edit table.

- Basic - Only the most common options are shown, but no tutorial text is displayed. This is the best mode for those users who are familiar with LISTSERV, but who are not experts and do not need to use the more advanced features. This setting is the default setting.
- Tutorial - Each web page is displayed with additional text that is meant to guide you through the options on the page. This is the best mode for beginners or for the occasional users.
- Expert - Each web page is displayed with no tutorial text, similar to Basic mode, and certain pages may contain advanced options that are not available with the Basic or Tutorial modes. The Expert mode is available for those users who are very familiar with LISTSERV or need access to any advanced settings.
List Owner Management
The List Management menu is the launch point for all list management functions. If you are the owner of only one list, the List Management page for that list will be displayed. If you own more than one list, you will need to use the drop down box to select the list you want to work with.
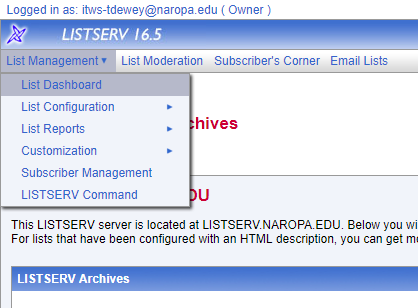
List Dashboard | This selection displays a user interface that organizes and presents information about your lists in a way that is easy to read. It allows you to quick access to adding or deleting subscribers or subscription options as well. |
List Configuration | This menu allows access to a subset of menus that leads to the List Configuration Wizard, Tasks, Alphabetic Keyword List, and Manual List Configuration functions. Under the List Configuration Wizard option, one is able to make changes to the LISTSERV settings. |
List Reports | This menu allows access to a subset of menus that leads to List Reports, Subscriber Reports, and List Activity Reports. Here one can see the reporting section which enables you to view and change the settings of your subscribers and lists. |
Customization | Web Templates (also referred to as Dynamic Web Templates) control the pages produced by the Web interface. These pages are produced dynamically when they are accessed. What gets displayed by the browser depends on the circumstances and may change depending on who is accessing the interface, which list they are accessing, the settings of that list, and so on. A mail template is a complete email message. Formatting commands are available, substitutions that make sense in the context of the specific message are available, and while other templates may be embedded with the .IM command, the message is in and of itself ready for LISTSERV to send. |
Subscriber Management | This function allows you to add or remove subscribers from your lists. It also allows bulk functions through a text file to be done here. |
LISTSERV Command | This page allows you to send text based commands for configuration functions without the need of using your email address. |
To add multiple subscriptions (for list owners):
To remove a subscription (for list owners):
To change the list’s configuration –Getting Assistance With Header Keywords:
To increase security, there are a number of actions for which LISTSERV requires confirmation before proceeding. In some cases, LISTSERV will accept a password-based validation. In other cases, email confirmation is required. When this happens, LISTSERV sends an email message with a subject line such as:
Subject: Command confirmation request (787EF897)
The string of letters and numbers in parentheses (“787EF897” in the example) is called a “cookie” (sometimes referred to as a “confirmation code”) and is different every time.
Once an “OK” confirmation request is sent out, you must confirm it within 48 hours in order for the command to be executed.
There are three methods of confirming the command:
- To confirm using the Web interface, simply click on the link that is provided in the email message sent to you.
- To confirm with email, simply reply to the email message, keeping intact the Subject line including the cookie. In the text of your reply, simply type “OK” (without the quotes).
- As an alternative method, you can also create a new email message with a blank subject line and the text “OK xxxxxxxx” where “xxxxxxxx” is the cookie from the original confirmation request email.
The cookie is the most important part of the “OK” confirmation method of validation. LISTSERV randomly generates a new cookie for each action that requires validation. All of the privileges within LISTSERV are tied to an email address. Only someone with access to your email address can make changes to your LISTSERV.
Caution: Never “OK” a cookie blindly. Make sure you are confirming a command that you initiated or a message that you want distributed to the list. Several cases of list “hijacking” or spam sent to well-secured lists have been tracked back to a list owner or moderator absent-mindedly clicking an OK link that they should not have clicked.
Was this article helpful?
That’s Great!
Thank you for your feedback
Sorry! We couldn't be helpful
Thank you for your feedback
Feedback sent
We appreciate your effort and will try to fix the article